Configure NCSC Top Passwords List in Azure AD
Configure top breached passwords in Azure AD
Last week in this post, I called for Microsoft to make checking of passwords in Office 365 & Azure AD to be free or at least part of the P1 plan instead of getting organizations to pay for a P2 licence. What I’ve learned from this thanks to Alex Simons is that Microsoft Azure AD already undertakes checks in all subscription levels, and P1 or above is only required to integrate with on-premises AD domain controllers.
I’ve been looking into this in more detail and in this blog I outline how you can include a breached password check for your users in Azure AD. It is so simple there is no excuse for not doing this, and the best part – it is free and included in all subscriptions – so thanks Microsoft.
As a side note I was confused with the ability for Office 365 to engage a playbook automatically based on a Risky sign-in, for that I believe you will need a P1 or P2 subscription.
Here is what you will achieve if you follow the steps in this blog:
1) Enable the automatic password checking, called password protection for Azure AD
2) Select a list of the top breached passwords and prevent users for using these passwords in your environment.
These steps will protect your environment from users who select easy to guess passwords, or passwords contained in previously published password breach data.
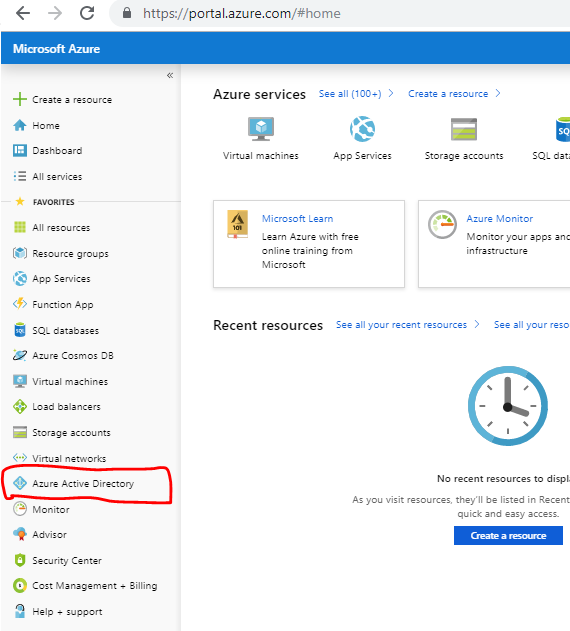
1: Login to Azure Portal, portal.azure.com, and select Azure Active Directory
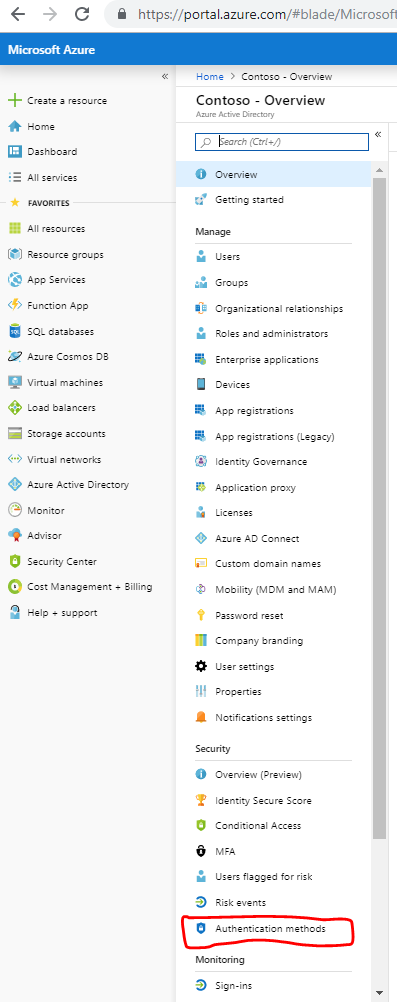
2. From there select Authentication Methods on the Active Directory Menu blade that appears
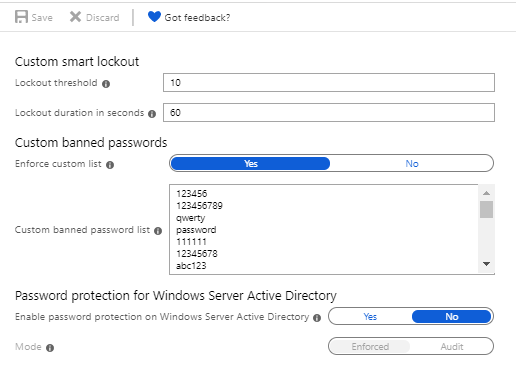
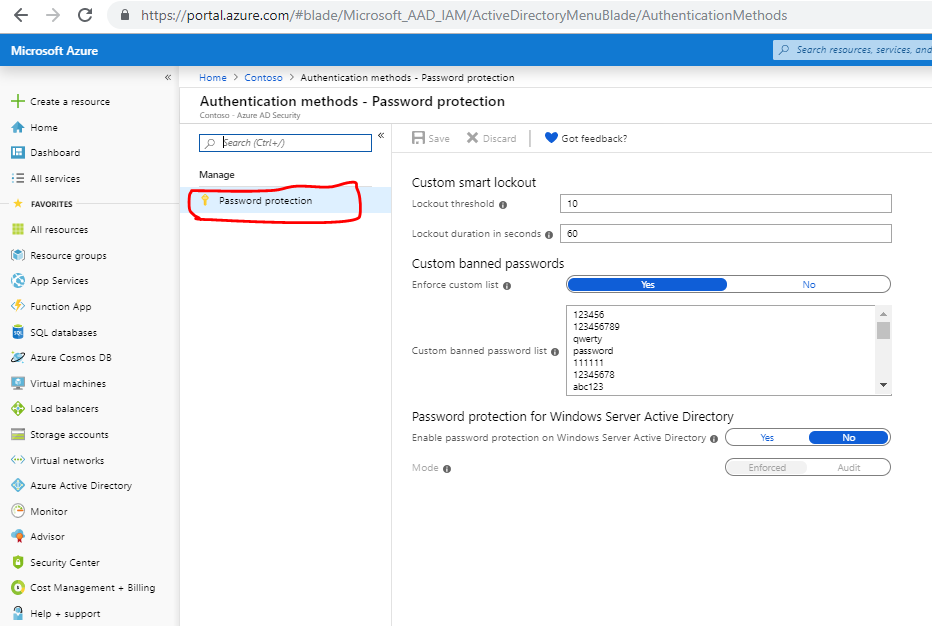
3: Next selection Password Protection and the options for configuring Password Protection will appear.
What Microsoft hasn’t told us, and why we should be grateful
The part of the blade we are interested in is Custom banned passwords. Before we get into that let me explain why this is really the only option for you in the configuration. Microsoft by default uses its own logic and rules to check passwords from login attempts and determine Risky Sign-ins. However, when I looked into this first, I assumed that Microsoft was taking a list of passwords from known data breaches and preventing users from changing their passwords to use one of these passwords. That is not the case.
Taking a password dump from a source such as Troy Hunt’s PwnedPasswords would make this easy to do. Microsoft is very opaque in how this works, what logic they use and the source of any data to enforce password protection. From a defenders viewpoint this was very frustrating initially, but if you sit back and look at it from an attackers viewpoint, Microsoft probably doesn’t want to publish what sources of data they have, what law or other government agencies they are working with, and what security intelligence they are gathering from their own monitoring. From that viewpoint it is not such as big deal as I originally thought – yes, it would be nice to know but that is more from my own interest in understanding how it works, and sources being used.
Password Normalization
What Microsoft has disclosed is that they do undertake some level of normalization so a password of P@55w0rd! and password1 and Password1 are all normalized and deemed to be the same and not allowed, according to documentation from Microsoft. So there does seem to be some logic in the Password Protection feature, rather than taking a raw dump of password data.
What can we do to Improve Password Security
Now given what we know, let’s move on to what we can do to improve security on an Office 365 or Azure AD environment using Password protection. Looking at the Custom banned list we have a limit of 1000 passwords we can add to this list.
In April the UK’s National Cybersecurity Centre (NCSC) published a list of the top 100,000 passwords which they sourced from Troy Hunt’s, who provides HaveIBeenPwned service, and also PwnedPasswords.
And herein lies some magic we can do with the NCSC’s List (Troy’s List) and Azure AD. Whilst we cannot take 100,000 passwords and include them in the custom banned list on Azure AD, because Azure AD limits us to 1000 passwords. We can include the top 1000 of these passwords, with practically zero effort.
It would be nice to include the full 100,000 or even a million passwords, but would it be practical. You can argue that automated password spraying attacks can zip through 1000 passwords in seconds, so you are not getting much benefit for including these in the banned list. On the other side I would argue that you can add these passwords to the custom banned list in a matter of minutes and enjoy another layer or hurdle attackers need to jump over, even if it is a low hurdle, remember we are trying to drive up the cost of the attack, so the attackers move on to a different target. The other thing to consider is that if you have a very large list of breached passwords, you will annoy and frustrate your users if you force them to select a unique password that has never been in a data breach, it could take them hours to select an appropriate passwords!
The other side of things is that these are the top 1000 because they are the most commonly used, and can you say categorically that no user in your organisation has used any of the top 1000 passwords, wouldn’t you like a control to ensure that is the case, for zero cost?
4: How to configure the NCSC top Password list in Azure AD.

Firstly you need to download the password list from the NCSC, which is a text file, and surprisingly small in size.
There are a few things to remember when preparing this list for importing into Azure AD.
Azure AD only supports passwords of 4 characters or more, there are some passwords in the NCSC list which are less than 4 characters in length, so you will need to remove these from the list.
Some passwords are completely numeric so be sure to format these correctly in Excel if you’re importing the data into excel. I recommend you import that data into Excel to identify the top 1000 passwords, or you can also use an editor like NotePad+ to do the same.
The NCSC data is sorted by popularity so you want to take the top 1000 as opposed to the ending 1000 entries.
I also recommend you don’t use the full 1000 slots, and keep a few slots in the list for your company name, location or common used passwords in your organization that you know of.
Once you are ready with you list simply populate the “Custom banned password list” field in the Custom banned passwords and hey presto your almost done.
If you have an on-premises Active Directory DC, then select the Yes option.
Finally switch on the “Enforce Custom List” and click the Save button at the top of the blade.

I recently returned from the InfoSec Europe security conference, and although there were 700+ vendors there, there is still a lot we can do to help ourselves with improving security, for free. This is a simple example, and also serves to demonstrate why we need more security platforms with integration points and less fragmented point solutions.
Once you configure this you can are then certain your users are not allowed to use one of the 1000 top passwords on the NCSC list, and this is in addition to whatever protection Microsoft is offering.
Go ahead, no excuse.